Monday, June 26, 2017

A Whirlwind Year

I'll start by breaking this blog's silence.

I was so very concerned with being the best teacher I could be, that I focused every ounce of energy my body had on my students, my classroom, and my teaching.

But the year has ended, and I am back to "normal" a more balanced life. Keeping up with our home, my family and friends, two courses for certificate renewal, crafting, and this.

My goal for next school year is to have balance through all aspects of my life: home, work, and play. So I am beginning by practicing it this summer.

But, alas, I will sum up my first year of teaching, in a post.

Let me take you back to August 17, 2016. I was headed to the west side of the state to visit a dear college friend when I received a phone call from my mom. She had just learned that a teacher had left her school district to take a position at another school. Now mind you, I've been wanting to teach there ever since I graduated. So I made plans to get my resume, application, and necessary paperwork around as soon as I returned home. So August 22nd, I turned everything in, and hoped for the best. On September 14th, I interviewed, and on the 21st, I met with the superintendent and learned that I had been selected to take over the kindergarten classroom. So on October 10th, I attended the school board meeting to wait to hear if they approved my selection. Little did I know about school board meetings, but it one swift motion, I was hired. A kindergarten teacher. And on October 11th, I arrived at school at 6:45, and my career began.

The entire year was pretty much a blur, but it was full of memories.
A field trip to the fire station, an apple orchard, the library, the ice cream shop, and the zoo.
7 seasonal door decorations.
A crash & burn activity involving marshmallows.
A very sneaky elf.
Being 100 years old for a day.
Many birthday celebrations.
The death of mine and my husband's grandfathers.
Some tears.
Some frustrations.
Lots of smiles.
24 wonderful children with hold places in my hearts forever.
Amazing co-workers who now have become dear friends.

I feel so blessed to be teaching children and changing their futures. But they are forever changing my future as well. Each day I became a better teacher for them and because of them.

And because of them, my heart is full.

I couldn't be more blessed to enjoy this imperfect slice of my life!

Saturday, January 7, 2017

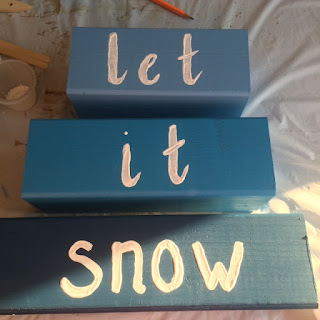
Let it snow blocks (Step-by-Step Directions)

I've seen lots of neat ideas for phrases to put on pieces of painted wood. And will all the dice I've been making, I've had 4x4s laying around. I saw a cute picture on a blog of blocks saying Let It Snow on blue blocks. Super cute and super easy. So I cut one of the 4x4s (actually, my dad did) and purchased my paint. It happened to be at a time when paint samples were only 99 cents at Lowe's for an 7 oz bottle. That's way cheaper than I can get acrylic paint. So I decided I would just use latex wall paint. What would it hurt?


I had my dad cut the 4x4s into 1 - 12 inch length, 1 - 10 inch length, and 1 - 8 inch length.


Here are the paints that I selected to complete the blocks.

First step, painting the blocks. I used the lightest shade of blue for the top block ( 8 inch block )
I painted the top and partially down each side, and then let it dry.

Valspar Tidal  Basin for 8 inch top block


Valspar Pool Party for middle 10 inch block

Valspar Deep Sea Diving for bottom 12 inch block


Blocks partially painted ready to dry. Once dry, I flipped them over and painted the remaining part of the blocks.

Blocks ready for lettering
Before I painted the letters on, I just lightly drew them on the blocks to make it easier to paint them on. 


After the paint dried the first time, I went over it another time to make sure I had even coverage. 

Next step: Snowflakes. 
I put the snowflakes on the middle block because of the extra space on the ends. 


Then I added snow flurries to the rest of the blocks to create a whimsical snowy scene!


Let is Snow! And enjoy your slice of imperfection :)


Sunday, January 1, 2017

DecoMesh Winter Wreath (Step-by-Step Directions)

Those of you who have read my posts before know that many of my ideas stem from something I see on Pinterest, TV or in a store. I have always wanted to have wreaths to hang on my front door for the Holidays. Our house is filled with many home decor items, and wreaths happen to be one of my favorites. I found these pictures on Pinterest and wanted to do something similar to them. 
                                      
 However, these picture did not give directions for how to make a DecoMesh Wreath. I had created a wreath for our wedding using burlap, so I thought I could handle it.

This is the burlap wreath I had made.
But, I am glad that I searched for a tutorial to help me. I came across this tutorial that Clumsy Crafter had to help get me started. I really just used it for the starter steps on the Wreath. After that, I kind of made my own rules to make it work the way I wanted it to!


Supplies Needed:
Wreath - these are available at craft stores with or without pipe cleaner
Hot Glue Gun & Extra Glue
DecoMesh - I used two rolls
Ornaments
Tinsel
Deco Tubing Ribbon (Not pictured here)
Scissors
Possibly extra pipe cleaners (I didn't have these, however, they would have been helpful)

I purchased all of these items after Christmas and was able to get them between 60% and 80% off.
Because of that, this project only cost me $13! Be on the lookout for those after Christmas sales!
And, really the only think you have to have is the wreath form and the DecoMesh. You can add whatever you would like to it, make it your own!

 Step 1: Bunch up DecoMesh to attach it to the wreath. 

Step 2: Attach the DecoMesh to the Wreath Frame with the pipe cleaner. And start moving aroudn the wreath attaching the DecoMesh.


I did this all the way around the wreath, however, I did not measure, which is the beauty of DIY projects; it doesn't have to be perfect of exact!
 I left between 4 and 6 inches between the pipe cleaners to add fullness to the wreath. 
I went around attaching another layer to the pipe cleaners giving it more fullness.

I went around a third layer on the outer edge of the wreath adding to the fullness.

I moved onto the inner part of the wreath. Doing the same thing as the outer layer. I had two different kinds of DecoMesh that I had purchased to give the wreath some more character. 
After going around three times, this is what I had achieved . I had to fluff it our some more, but over all, it look pretty good. 

There were a few bare spots so I cut some small pieces and attached them to the wreath with pipe cleaners to fill in the voids. 

After filling the voids, I had a much fuller looking wreath. 

Here you can tell the difference in the two types of DecoMesh. One of them has more of a shine to it, you can mix them together like I did, or use just one type. Totally your preference. Remember, make it your own!

Step 3: Add tinsel to the wreath, attach it with pipe cleaner. 

After the tinsel was string and the DecoMesh was fluffed again.

Since I had decided to use a green wreath frame, I wanted to add some green and I had purchased this Deco Tubing Ribbon  after Christmas last year (I figured I'd use it on something!). If you like things super matchy-matchy, then I would suggest getting the same color wreath as your DecoMesh.

I attached it with the pipe cleaner and just wound it around and around until I had the pop pf green that I wanted. 

After I had it all wrapped around, I tied it to the back of the frame
 Step 4: Add ornaments.

Be sure to securely hot glue the ornaments to the DecoMesh

After I got it home, I decided that I wanted to add a bow to the bottom of the wreath. I used some blue DecoMesh ribbon that I had left over from my wedding. It fit right in with the color of the wreath. 
DecoMesh is difficult to make into a bow, so if you have never made a bow before, I wouldn't recommend making your first one using DecoMesh.
I started out making it like a bow

I kept wrapping it around.

I gathered the ends together and glued it down to hold it into place.


I wrapped a small piece around to create the illusion of a bow, and added some tails to it to complete the bow. 

Step 5: Glue the bow on


Step 6: Add a hanger. I used a pipe cleaner and wrapped it around the wreath frame. And then secured it with hot glue. I purchased a pack of 45 tinsel pipe cleaners for $1 at the Dollar Tree.


Ta-da! All finished! Can't wait to be able to hang it up, and ti will work all winter because of the silver, blue and green!:)


My biggest caution is to be sure that everything is attached securely before you pick the wreath up, you don't want anything to fall off and break. 

Happy New Year! 
Take care, and enjoy your own imperfect slice of life!

Wednesday, December 28, 2016

Button Christmas Tree Canvas (Step-by-Step Directions)

About a year an a half ago, I made a button tree to hang in my craft room, and it was very fun to create. You can see it here
But, with the Holidays in full swing, I decided that I need to create a Button Christmas Tree to hang in its place.

Button Christmas Tree

view tutorial at imperfectsliceoflife.blogspot.com

To complete this project, you will need:
A canvas (I used an 8x10 canvas I purchased at Hobby Lobby)
Acrylic Paint (white, brown, green and a background color)
Paint Brush
Buttons (lots of green, white, brown, star, & snowflake if desired)
Pencil (to sketch out design)
Hot glue & Hot Glue Gun
Coordinating Ribbon (to create a hanger for the canvas)

I had thede two tubs of buttons I purchased for another project, so I pulled out white, green and brown

Paint used for the background

Brown, green and white paint used to paint designated areas of the cavas

Star Button for top of the tree (purchased at Hobby Lobby)

I purchased this botton assortment from Pat Catan's to give me more green buttons to complete the project

And I found these snowflake buttons at Wal-Mart - perfect to round out the canvas!


First thing to begin the project is paint the canvas.

Once the paint is dry, draw on your tree shape

Then, using a thin brush, carefully outline the tree shape using the green acrylic paint.

Fill in the entire tree shape 


While that is drying, carefully paint the trunk of the tree using the brown acrylic paint

And while that dries, paint the snow, using a thin brush and white paint

Let all paint dry. I let it dry overnight to be sure, I didn't want to smear any of the paint while I was working with the buttons.


Once it is completely dried, start to place the buttons on the canvas.
I started with the trunk because it was the smallest area.

Fill in as tightly as you can with the buttons

Then more onto another area, I chose to move onto the tree.


Once I started working, I thought it would be best to get the points of the tree done, so that way I can a nice clean look. 

Then, I continued to fill in throughout the rest of the tree.

Next, I added the star on top of the tree. What tree is complete without the star?
If you don't want a start atop the tree, skip this step.

And finish off by filling in the snow at the base of the canvas.


And to add to the beauty of the canvas, I added the snowflakes to make it look like a scene outside my window on a wintery day.

After everything was attached, I hot glued a hanger to the back - I used some green ribbon I had left over from a project. 

And viola, you have a beautiful Christmas Tree canvas to decorate your home.


Take time to enjoy the imperfections in your holiday season!

Happy Holidays to you all!